Getting Started with Vidsy.ai

A vision agent for analyzing videos and live recordings, running locally on your machine.


1. Installation​

System Requirements​

  • Windows 11 (64-bit)
  • 16 GB RAM (minimum)
  • Recent CPU (modern Intel/AMD)
  • Optional but recommended: CUDA-supported NVIDIA GPU
  • ~3 GB of disk space

Download & Install​

Download the installer from:
Download Vidsy.ai

Run the installer and follow the setup instructions.


2. First Launch Setup​

On the first launch:

  • Ensure you are connected to the internet.
  • Vidsy will install:
    • The engine (runs the analysis models)
    • A template project (contains the default analysis models)

πŸ•’ This process may take several minutes.
A progress bar at the bottom of the app shows progress.

info

When the bar disappears, setup is complete.

warning

Avoid interacting with the app during this process β€” it’s still initializing and might misbehave.


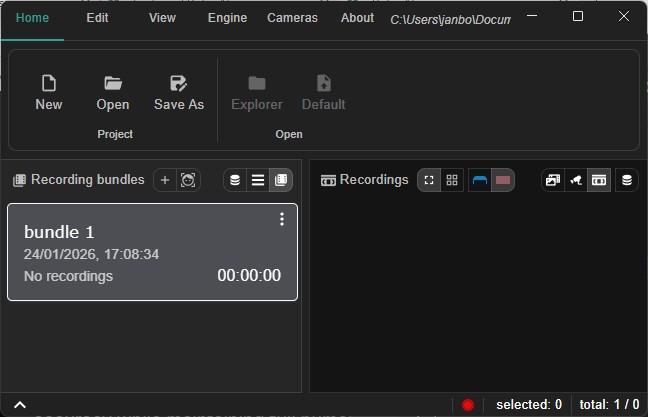
3. Creating a Recording Bundle​

Recording Bundles are groups of related videos (e.g., by location or session).

  1. Open the Videos View:
    Menu β†’ View β†’ Videos

  2. Click the βž• button next to Recording Bundles

  3. Enter a name (e.g., a street name).
    The large number is the title and can be edited.

Screenshot of creating a bundle


4. Adding Videos to a Bundle​

You can add .mp4 files to your bundle in two ways:

  • Drag and drop videos from Windows Explorer onto the bundle card
  • Right-click the bundle card β†’ Add File
tip

Make sure the bundle is active β€” it will have a white border. Click it to activate.

info

When active, videos will appear on the right panel.

Screenshot of video list in a bundle


5. Analyzing Videos​

Once videos are added:

  1. Click the face icon (next to the βž• button) to start analysis
  2. Choose:
    • All β†’ analyze every video in the bundle
    • Selected β†’ only visible/selected videos (multi-view mode)

Screenshot of analyze button

Engine Status Indicator:​

After startup, the engine might not yet be fully running. You can check the status in the lower right corner:

  • πŸ”΄ Red = engine not running
  • 🟑 Yellow = engine starting
  • 🟒 Green = engine running

πŸ•’ Wait for the analysis to complete.

info

Blue bars will appear above or below the videos showing detected events.


6. Understanding Events​

  • Events represent segments of interest in the video.
  • Each includes:
    • A type (e.g., B-D-D-A)
    • A message (e.g., β€œclear water”)
    • A start time, and depending on the type, a duration

They help inspectors quickly locate important parts in the video.

You’ll see them:

  • On the timeline above or below the video, depending on the selected view.
  • In the Events View (on the left panel)

Screenshot of events in timeline


7. Troubleshooting​

  • ❌ Engine didn’t start?

    • Restart the app
    • Switch to CPU mode:
      Menu bar β†’ Engine β†’ Switch to CPU Only
  • ❌ Install failed?

    • The app will attempt reinstallation on the next launch

8. Giving Feedback / Improving the Model​

If you see a missing or incorrect event:

  1. Take a screenshot of the video frame
  2. Annotate it with the correct label
  3. It will be saved to the internal index database
  4. Export the annotations and send them to the developer
    (or use them yourself for model training β€” coming in a future tutorial)

9. Coming Soon​

  • Exporting results to CSV
  • Improved sewer inspection template supporting points of interest and measurements
  • much more